How Fiber Optic Cable Bends Snap Your Speed
You slowly wrap the fiber optic cord around a wooden beam in the attic, and you hear a minor cracking noise in the stillness. You see your router change from a green light to a red light and also notice your speed tests have reduced to zero. That little sound conveys such a large message—it indicates your fiber optic cable has been bent beyond the manufacturer’s specifications. There is a thin tube of glass inside the cable where the light is traveling, and this glass is narrower than the diameter of a strand of hair. The glass was manufactured to bend to a particular degree. If the cable bends beyond that angle, the light (photons) will escape from the glass and cause the Internet to slow down, increase latency, and affect gaming and streaming by creating a heavy fog effect.
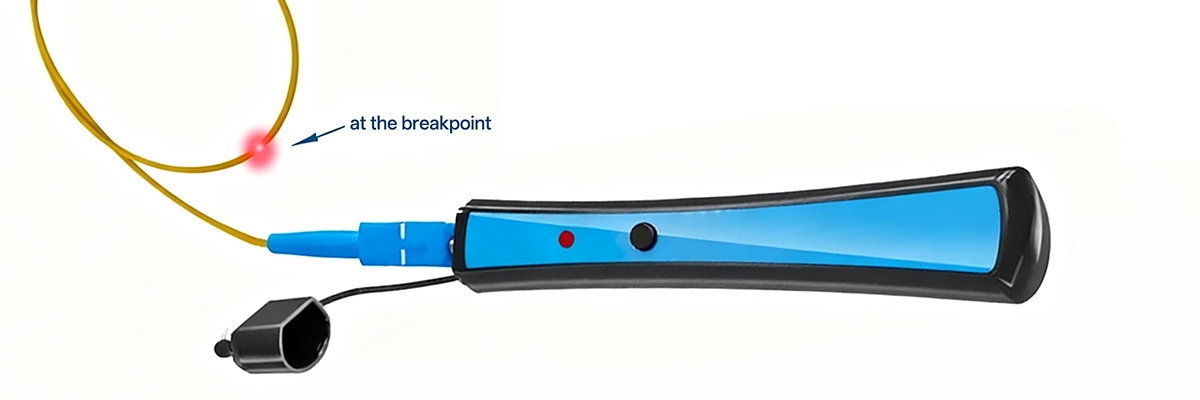
The silver lining is that calling a repair service or replacing everything is not necessary. Most damage to your optical fibers can actually be repaired in your own home with a little patience and a few tools, including a red laser pen (visual fault locator), an alcohol wipe, and a cleanly cut segment of fiber optic. If you follow these steps properly, you should regain full strength within minutes by tracing where light leaks out, cutting a section from the cable, and reconnecting it using some dried electrical tape, creating a slight loop in the cable (approximately the diameter of a soft drink can) before splicing, because in optical fiber cables, geometry creates the difference between chaos and harmony. Respect the arc, and the light will respect you!
[TECH CHECK]: While the author’s geometry and cleaning advice is 10/10, electrical tape cannot align glass fiber. To actually restore your signal, ensure you use a Mechanical Splice with index-matching gel.
 Red Glow Caught My Joist Rub Killer
 Red Glow Caught My Joist Rub Killer
As soon as the red light from the 10 mW VFL entered the cable, it illuminated with a gentle glow. This pure red color then seared a brilliant burst of bright white illumination at the edge of the joist, showing that the fiber optic had cracked, was under severe pressure, and had leaked light. The leaks can be seen on the fiber, but for an Internet router’s fiber, these leaks are not detectable. Before using this method, the fibers should be disconnected from both ends, put in a dark room, and the light should be allowed to tell its tale. A pinpoint flash of red indicates a total fracture of the fiber; a hazy light that spans several inches indicates the existence of microbends or very small bends in the fiber that reduce the speed of the fiber to half of its original speed before being completely broken.
As you trace the full length of the fiber optic cable, you should see a continuous straight line, which indicates that the core fiber is still healthy. Any bluish haze found on the cable’s jacket could indicate areas of excessive pressure, pinching, or deformation along the path of the fiber. Even one zip tie placed too tightly on the outside of the jacket can cause enough bending within the core to misalign the light path, requiring routers to resend packets multiple times. When performing home tests, using a pen-style VFL with 5 to 10 milliwatts is adequate for visibility and safe for use. Keep in mind, however, that in low-light situations, the brightness of the 10-milliwatt beam can be blindingly bright. Therefore, never look directly into the beam of the VFL and never visually inspect a live telecommunications cable. Lasers that emit infrared light, used by many service providers, can lead to serious injury if not handled properly.
After locating the breach, make a mark about six inches away from the damaged area on both sides before cutting. Microcracks can extend unseen from the original point of failure, and six inches will cover the entire visible area. By taking your time with a red laser to locate the place of failure, you will learn how pressure and geometry create their own “stories” with respect to how light acts. By taking the small amount of time and effort to work in this manner, you will save yourself days of work trying to determine the cause of your “perfect signal” that is anything but.
Cleaver Wipe Splice Saved My Shelf Drop Kink
 Cleaver Wipe Splice Saved My Shelf Drop Kink
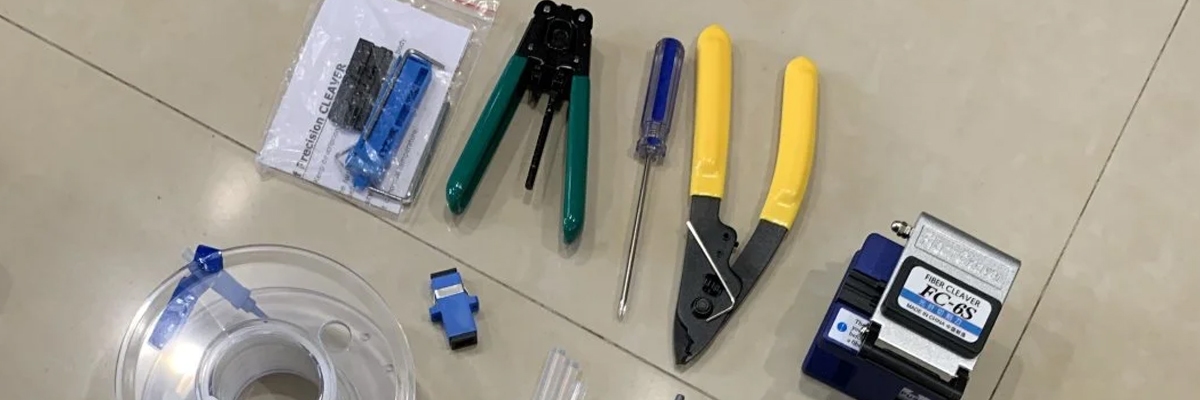
The break occurred during a brief tugging motion to dust shelves on a winter afternoon. The metal jacket did not appear damaged, but this bend would have been seen through the light tube. While repairing fiber may seem fragile, it follows a systematic rhythm—a sacred style performed clean and composed. I had been using a precision cleaver and mechanical splice kit to carry out this procedure. Preparation is the first step to success: using a slow, firm pull, strip the protective coating from the end of the fiber, being careful to stop before the exposed glass can flex too much. Although this part of the process appears relatively simple, beginners should not attempt it on their primary optical cable until they have had plenty of practice on spare or broken pieces. The ability to strip the protective coating from fiber optics without breaking the glass requires a great deal of practice and muscle control that only comes from repetition of this technique.
To clean the stripped surface, take a lint-free cloth and dampen it with 99% isopropyl alcohol. This will remove any oil and dust from the surface, which would have reflected light away from the splice. Allow the alcohol to evaporate, then make the cut. The correct cut will produce a dry tick instead of a crunch. The dry tick indicates that the end of the fiber is flat enough for the light to travel straight through. Be careful not to touch the end of the fiber after cutting. Even a fingerprint can reduce decibels of light lost at your splices. Once you have made the cut, insert both ends of the fiber into the groove of the mechanical splice that has been filled with index-matching gel. The index-matching gel will carry the light from one end of the fiber to the other without introducing a loss of light due to the splice.
After securely fastening the fiber through strain relief, make sure to redo the test using the red ink pen. If you see the joint glowing bright and clear, it has been made correctly. If the joint appears cloudy or hazy, it indicates the two ends were not lined up properly; re-cleave the fiber for another test. Be sure to keep all fiber shards contained properly; the shards can be very difficult to see and are very sharp and dangerous to skin and eyes. Properly made fiber joints can be good for a long time, but there is one caveat: the mechanical splice relies on the clarity of the gel to hold the two ends together. As the gel ages, it may absorb moisture, which can cause the splice to degrade over time. Generally, the gel splices are OK for home repair. However, the best way to make a long-term professional installation of a spliced fiber is to use electric arc fusion by using electric arcs to seal the ends of the fiber together. For everyday use, a proper clean cut and a steady hand will outlast any costly tools you can buy.
Coke Bottom Loop Won My Yard Thick Pull
 Coke Bottom Loop Won My Yard Thick Pull
Outdoor cables face extreme conditions. I’ve had to bury fiber in extreme cold and wind, creating very tight turns around conduit corners, which completely blocked signals. That’s when I learned the first rule of installing fiber: the bend radius should be the same as that found on a Coca-Cola can. The arc of the Coke can must provide the minimum bend radius for most home fiber installations. For single-mode OS2 fiber, there can be no loops with a tighter radius than the Coke can arc, while for multimode OM3/OM4, loops may be a bit more aggressive. However, never force your looping while pulling. Stress while pulling is worse than after installation because tension multiplies the amount of stress on each bend.
The cold increases the chances of an issue occurring. While inside the jacket, the plastic becomes stiff, which creates minor cracks that expand as you push the cable through. To recover flexibility, use heating on just the end before using outdoors or lay flat indoors for several hours first. Practicing this on a soda can will help you understand what “safe tension” feels like. Light travels through the fiber at predetermined angles. If the path is overtightened, some of the light will escape to the sides instead of traveling straight down the fiber. This results in a reduced amount of light transferred to the other end. Although it may seem like a silly recommendation, it is actually a field-tested method used by technicians to gain an understanding of the physics involved and then apply them to their work. After running the cable, always include some extra slack for ground shifts and movement caused by temperature changes. Flexibility in the cable allows it to survive the elements.
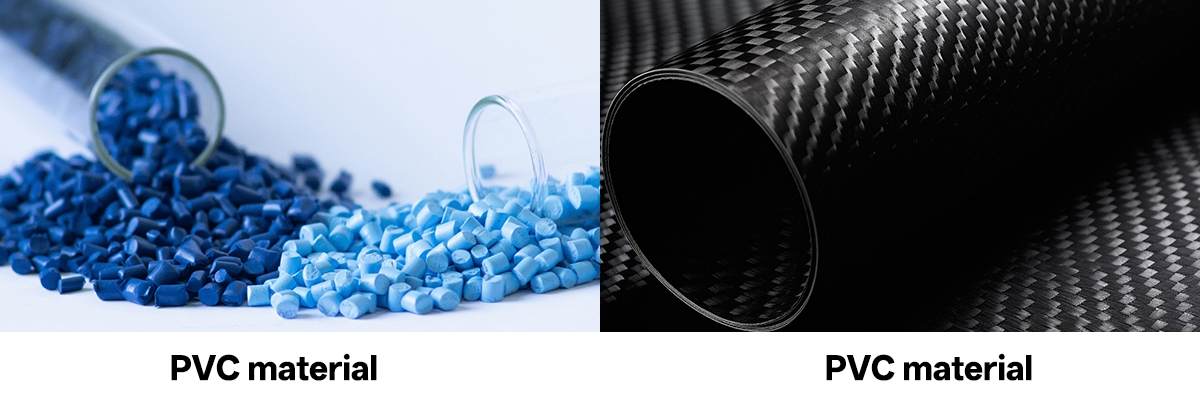
PVC Cold Dent vs Nylon Snapback Trick
 PVC Cold Dent vs Nylon Snapback Trick
While my underground data line with a PVC jacket was tested clean by its connectors, its real enemy was much more vague: fatigue. I discovered that pressing a nail into a scrap piece of the leftover PVC created a perfect indent that would never come back out again; in contrast, I did the same test with a scrap piece of nylon or LSZH, and they returned to their original condition. The reason for this difference is the elasticity of the two materials. PVC stiffens when it gets cold, causing it to compress against the glass and develop microfractures, while nylon and LSZH both maintain their elasticity and diminish any stress that may be applied from flexing. When temperature causes the PVC to lose its resiliency, the bend radius becomes effectively zero; therefore, all the little places where the PVC is bent cannot send the light in the same direction, which causes diffusion of the signal.
Switching to nylon jackets is a permanent fix to this issue. Nylon has the ability to resist daily expansion and contraction due to its rebound capacity, and the density of nylon jackets helps them resist UV radiation and chewing by rodents. Therefore, the most important consideration for a contractor or homeowner using cables in a fluctuating climate is the type of jacket material used, not the brand name or the price of the cable. The price difference for using nylon jackets versus cheaper PVC jackets may be slightly more for nylon jackets, but the longevity and reliability of nylon jackets are far superior to what a contractor would save by using cheaper PVC. In short, the rule is simple: a flexible jacket equals stable light.
Neutral Soap Sweep Tamed My Doorframe Beast
 Neutral Soap Sweep Tamed My Doorframe Beast
A minor battle erupted when pulling fiber through a doorway. The cable refused to move past the doorway frame for some time until I created a mixture of warm water and a tablespoon full of neutral dish soap. A quick spray of the mixture onto the cable dried almost immediately, making the cable slide through the frame like it had been greased with silk. The neutral dish soap reduces friction on the cable without breaking down the jacket integrity of the fiber, unlike other detergent-type products, which will eventually break down polymer chains in the jacket casing and cause the cables to eventually become brittle and break months later. Neutral dish soap is also safe for use when doing “one-off” projects like this and will wash off quickly.
Friction is a silent foe for fibers and causes damage gradually. Damage caused by a dry pull results in surface burns, which create concentric stress marks that will fluoresce red under a fluorescence test when seen later. When working with tight frames or tight corners, there should always be at least one foot of slack on each side of the frame to prevent friction build-up. For longer routes or where multiple wires are being pulled through the same route, lead the fish tape with the lubricated fiber attached and have someone feed it while you pull slowly from the opposite end. Many professional installers choose to use silicone-based lubricant, as these offer light, clean, non-soiling, and non-rust properties, especially when there are multiples going to different floors. When using silicone, it is important to clean any residue with a wet rag before placing the fiber near the connectors. Fibers are much more likely to survive the pull if proper form and patience are used rather than brute strength.
Tie Pinches Fueled My Game Retry Madness
 Tie Pinches Fueled My Game Retry Madness
When I began gaming, I became aware of a consequence of using the Internet—pinging high while everything else looked great. As it turns out, the culprit was directly behind my desk: a single zip tie holding the fiber cable so tightly that it compressed the fiber to flatness. As a result of this compression, the fiber loses its circular cross-section and produces erratic bursts of light with each packet of data sent through the fiber. Each packet of light that is scattered requires retransmission, which results in latency. Replacing the zip tie with a simple Velcro strap instantly corrected this issue.
Fiber cable breathes slightly with temperature, and therefore the tight plastic ties create binding stress due to the motion of the fiber. Therefore, every tie should be slightly padded or elastic so that the fiber can have limited movement during temperature fluctuations. Velcro and soft strap ties allow a small amount of micro-movement to keep the fiber in the center of the cone. After correcting the way my fiber was restricted via my zip tie, I reduced my latency to 50% without any adjustments to my router. I also realized the importance of looking for tied-up fiber in hidden places such as under furniture, behind routers, or under carpets. Fiber does not fail dramatically but becomes unreliable and will fail without notice. Therefore, avoiding mistakes when tying fiber is more about touch than technology.
Joist Map Skipped Every Door Pinch
Following numerous random failures, I decided to stop the guessing game, so I took a piece of paper and created a map of the entire cable path as detailed as possible. I kept track of every nail, hinge, and the position of each of the joist notches that the cable crossed. The drawings provided what my signal tests couldn’t supply; i.e., the sharpness of turns, the length of loops, and also the locations of stress points along the cable being stacked on top of each other.
After rerouting the cable to include more gradual and smoother curves instead of sharp turns or tight loops, my cable would now have a single stream of red along its total length and also would now run at a much faster rate than it had for months.
Although planning may appear to be very tedious, creating a physical representation of the cable route (like making an X-ray of the walls) reveals the invisible forces acting upon the cable and produces repeatable patterns that you can predictably follow in the future.
Once a cable route is drawn out and created in your own home, there will be no more guessing on your part ever again. When you have completed your own drawings, you will never need to guess again about where to place the cable again.
One Pinch Drops Speed Half $250 Pain
 One Pinch Drops Speed Half $250 Pain
One instance of oversight demonstrated just how costly ignorance can be. While changing my carpet, I accidentally pinned a hidden clamp underneath while pinning down the edge. The next day, my Internet connection was operating at half speed, although nothing appeared to be wrong. The weight of the clamp on the glass altered the way the fiber optic signal traveled down the glass, creating multiple reflections of each pulse that caused some of the reflected signals to bounce back toward the modem and not reach it in time for the next pulse to arrive. The modem therefore resends all the “good” packets twice. By the time the technician arrived, he was shocked at the failure of my installation and within minutes had cut out an inch of material, resulting in a $250 charge. I was taken aback by this bill, but I was more distressed by the fact that I could have avoided this expense had I done an additional check. In the field of fiber optics, the smallest of mistakes can quickly add up in the amount of time wasted and the amount of pressure or resistance created. Therefore, every bend, knot, tie, or clamp carries with it an element of cost.
5‑Step Pinch‑Free Pull Armor
The lessons learned have been summarized into five simple habits that will keep your fiber lines functioning properly. The first step is to ensure that your inner jacket conforms to its environment, i.e., choose a jacket made from nylon, LSZH, or blends that are rated for either Outdoor or Extreme conditions where they will be subjected to the elements (cold temperatures and intense sunlight). The second step is to install the bend radius using the Coke Can method (maximum bend radius equals 3 × the diameter of the fiber) and NEVER pull tighter; pull straight instead! The third step is to run a 5 to 10 mW Glow Test on your completed or terminated system before you seal it or hide any cable behind walls; this will verify that there are no hidden leaks. The fourth step is to ensure a smooth pull by using either neutral soap or silicone lube during installation to minimize the creation of heat on the inner jacket while creating the bend. Lastly, when you fasten the cable to either a cable tray or some other smooth surface, use only Soft Ties or Velcro that will allow movement with temperature changes but will still hold the fiber securely in place. Following these five simple habits, over time, you will dampen the feedback loop that causes a loss of tensile strength in a fiber optic cable and prolong the life of the fiber. Light will travel quickly yet will only remain true to its path when the path is smooth.
Conclusion
Those who take their time to care for fiber optics are rewarded. Fiber optics contain a system that is made up of a series of jackets and glass that exist in a world of regularity, cleanliness, and patience. All of the things that are done, such as finding and fixing a red glow leaking, or paying attention to the can-shaped curves in the cabling, refer back to the same thing—smoothness means speed! When your Internet goes down and you loathe the thought of calling for an expensive service repair, remember the sound of the “faint pop” you heard from the attic. Your speed has not gone away; rather, it is leaking! If you take your time to put the fiber route back together correctly and do not add tension to the connections, your speed will return on its own as well.
Be sure to keep this five-minute checklist close. You can verify and find leaks in your fiber connection using a 5 to 10 mW red beam. Use a flexible jacket so your fiber can expand and contract based on the changing temperature outside. For bends, make sure that all of your bends are wider than a Coke can on the bottom. Use a neutral soap solution when pulling cables, and ensure that you provide adequate support for your cabling, as they need “air” or “breath.”
Finally, clean all of your connectors, remember to flat splice, and be sure to handle the fiber with care and calmness, as these simple acts of ritual will help to ensure your connection is solid. When patience and physics come together, glass will obey. Treat your fibers well, and the speed you experience will last for as long as there is light.
Reference Sources
- Fiber Optic Cable Bend Radius Guidelines
Fiber Optic Association (FOA)
Details minimum bend radius specs: 20x cable diameter under tension, 10x post-installation to prevent signal loss. - Fiber Optic Cable Repair Techniques
Multilink
Outlines 5-step repair: cut damage, strip, clean, splice, and test for home or field fixes. - Visual Fault Locator (VFL) Usage
Jonard Tools
Explains VFL for detecting breaks, leaks, and stress in single/multimode fiber up to 3 miles. - Mechanical Splice Procedures
Beyondtech
Covers stripping, cleaving, cleaning, and gel splicing for low-loss fiber connections. - Cable Jacket Materials Comparison
MeFiberOptic
Compares PVC (soft, toxic smoke) vs LSZH/nylon (rigid, low-smoke, elastic for harsh environments). - Installation Best Practices
GCabling
Provides dynamic (20x) and static (10x) bend radius rules plus tension management tips.